

How To: Retrofit An OEM Reverse Camera To Mk3.5
I'm still sorting the layout and added new sections at present (15/01)
I accept no responsibility for any damage or injury caused by this guide. This is merely the steps that I took to add the factory fitted reverse camera to my 2015 Ford Focus written in a format that someone else could follow. Your car may be different and these steps could cause a negative impact to your car making it un-drivable. Following these steps could also potentially void any warranty you may have on your car.
This guide shows how to retrofit the OEM (as if it had come from the factory) reverse camera to a mk3.5 (facelift) Focus ST with the Sync2 8 screen. All the credit goes to @Tezza! Terry was the first one to try this and get it working on a friends car, he gave me so much advice (especially when I couldn't get it working because of the power converter module being different!) that I couldn't have done it without him.
I wanted to activate the OEM reverse camera to reduce the risk to my warranty (as it looks factory fitted, the are less likely to expect any tampering) and to give a factory look and feel. There are other options available, such as Nav.tv (Link) or buying an external screen and camera (Link). These options do work out cheaper but in my opinion are not as good.
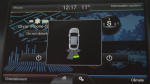
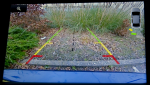
The rear view camera shows the image on the 8 Sync2 screen automatically when you engage reverse. The camera sits in the boot button housing. It comes up with guidance lines, still shows the parking aid and even has an option in the settings to delay the camera going off, so that it only goes off after you apply the handbrake or go over 7mph. The image looks good in the dark too. The only thing I have found is that it get dirty, you can still see out of it but it's not as clear as when it's clean. I've seen VW and Mercedes hide their cameras when they aren't in use, high I thought was just to look cool but actually stops the camera getting dirty, perhaps Ford will do that for the mk4
")
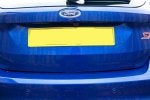
Before
After


Parts Required
- Ford Camera £160 - F1873024
- Ford Rear Boot Wiring Loom £60 - F1913858
- Ford Boot switch with camera housing £38 - F1899428
- Ford Power Converter Module £114 F1880916 (may not be required, see power accessory module check below)
- UCDS software, adapter and demo licence - £112 (see buying UCDS below)
- 1 x 10A and 1 x5A mini fuse (may not be required, see Fuse Check below)
Total with Power Converter Module - £484
Tools Required
- Laptop and Charger (it looks like UCDS is supported on Windows 7 and above but for this guide I used Windows 10 so can only recommend that)
- Extension lead for the laptop charger
- Philips screwdriver
- Torq screw driver
- Spanner 10mm (Rachet and adjustable)
- Plastic removal tools
With this guide I would estimate it would take around 4 hours to install the hardware and around an hour to do the software update. If anyone finds it takes a different amount of time, let me know and I will update this.
Complexity Level
Medium requires the following:
- Removing interior trim
- Removing the rear spoiler
- Changing the wiring loom in the boot
- Replacing a module
- Changing settings in the APIM
Buying UCDS
This software is needed to edit settings in the APIM (Accessory Protocol Inferface Module). The UCDS software also requires the UCDS cable (similar to the ELM cable) which is what costs the £112. This guide is written using this software but there are others options available such as ELMConfig and FoCCCus which may be able to activate the reverse camera.
These are both available from www.ucdsys.ru. I emailed them using the email addresses on their website and paid using PayPal. The software is available to download but requires a licence. The licence runs on credits, however when I emailed them they said that for simply activating the camera only requires a demo licence which is free of charge.
Power Converter Module Check
As I understand it, depending on which other optional extras you have in the car depends on which power converter module you have already installed in the car, there are two fitted from the factory; BV6T 14B526 BC and BV6T 14B526 AC. The one ending in AC is required for the camera to work. Without it you get camera is not available, please contact dealership. To check which version you have
1. Under the dash on the drivers side, open the compartment

2. Using your hand, bend the two sides together which will allow you to pull it all the way down.

3. Get down low and look through, you will see the module and should be able to just make out the part number.

4. If it's BV6T 14B526 BC, you will need to order the BV6T 14B526 AC module, if it's already BV6T 14B526 AC, you don't need a new module happy days!
<photo to be added>
Fuse Check
The fuses were already present on mine but it's worth a check
There are two fuses; one in the engine bay and one in the rear boot compartment.
Engine Compartment
1. In the engine bay remove the fuse box cover
<photo to be added>
2. Ensure you have a 10A fuse in f28 which is required for both the Collision warning system and Rear View Camera
<photo to be added>
Rear luggage Compartment
1. In the boot on the left hand side open the fuse cover door (I say door, it's a bit of hard carpet with some bits on!)
<photo to be added>
2. Endure you have a 5A fuse in f29 which is used for Blind spot monitor, Lane keeping system, Active City Stop and Rear view camera
<photo to be added>
Removing the boot trim
1. On the boot handle, use the plastic tool to pop out the handle cover
<photo to be added>
2. Behind here you will find two screws per handle, undo these using a Philips screwdriver
<photo to be added>
3. Now pull the boot panel downwards and away from the boot itself, in this motion
<photo to be added>
4. Prise the top panels
<photo to be added>
Removing the Headlining
Part of the wiring loom goes into the headlining, luckily you don't need to take it fully down, you could just about squeeze your hand in and feel the connectors into place but it makes it easier to pull the rear headlining down a bit.
<photo to be added>
Removing the spoiler
<text and photo to be added>
Installing the wiring loom
<text and photo to be added
Installing the camera
The camera comes separately to the boot switch.
1. Place the camera into the boot switch hole


2. Pull the plastic clip down over the top, you will hear a click when it's in place.

3. Attach the left hand plug (for the number plate lights and boot switch) and the right hand plug (for the camera) to the loom socket.

4. It's worth checking that your number plate lights and boot switch works before pushing this back up, because it's a pain in the ass to get back out again!
5. Push it back into the hole so that it sits flush.
Installing the Power Accessory Module
If you need the power accessory module (check detailed above), follow these steps
1. Under the dash on the drivers side, open the compartment
2. Using your hand, bend the two sides together which will allow you to pull it all the way down.
3. Get down low and put your hand through. You will feel a bolt that needs to be removed, remove it using an adjustable 10mm spanner. It's a long bolt, so feels like it takes forever to unwind.

5. The module is hooked over cross member, so unhook it and then guide it towards you. Now that the module is lose you can remove the clip by pressing the retaining clip. You can put your hand under the dash to remove it if that's easier
6. Now feed your new Power Accessory module into the space and plug the cable into it. You now need to line up the hole and do the bolt back up. I won't lie, it's a right pain in the ass because of the way it sits, be patient
Activating using UCDS
1. As I said before, I would advise installing this on a laptop and only connecting the laptop to the car when it's connected to power rather than just running off the battery. I might be being cautious but the last thing you want is your laptop to die just as you are writing to the APIM.
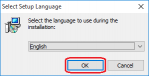
2. Download the software from http://www.ucdsys.ru/forum/viewtopic.php?f=1&t=4, this guide was written based on version v1.26.008
3. Run the installer and click OK
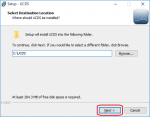
4. You can either leave the install path as C:\UCDS (recommended) or change it to install somewhere else, click Next
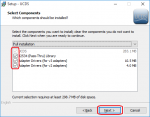
5. Ensure that all the tick boxes are ticked (so that it installs the adapter drivers as well) and click Next
6. You can change the name of how it appears on the start menu or leave it as UCDS (recommended) and click Next

7. Make sure these two tick boxes are ticked so that it installs the UCDS adapter drivers
8. Click Install

9. Wait for the installer to complete (normally around 30 seconds)

10. This is a sub-installer, which is installing the v2 adapter drivers, click Next
11. Click Finish

12. This is a sub-installer, which is installing the v3 adapter drivers this time, click Next

13. Click Finish

14. Click Finish to complete the UCDS setup

15. The install should have placed an icon on your desktop called UCDS, double click it to open the software

16. This will load the software

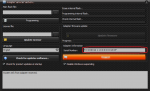
17. Plug the adapter into your computer and select Setup / Services

18. Click Request, this will generate the UCDS adapter serial number. You will need to provide this to the UCDS support so that they can generate your licence key file.
19. They will send you a .lic file, save this file to your computer where you can find it again

20. Still in Setup / Services, select the to open file explorer, to find your .lic file

21. Find the lic file you saved earlier

22. Click Update Licence

23. Your licence should now show at the bottom of the main menu as demo mode active. Connect the UCDS adapter to the ODB port of the car, this can be found under the drivers side.
Photos
24. Once the adapter is connected, select CAN MODE
25. Select Update Wizard

26. Select Focus III [C346]-2015 and click Next

27. Select Get Info from car, turn on your ignition when prompted and click OK

28. Change line 99 to With Park Assist Camera, Accessory Only

29. Select Write AsBuilt to BCMii

30. Select Write AsBuilt Backup to IPC

31. Next up, go back to the main menu and select Direct Configuration

32. Select FOCUS3[C346] MY15 > APIM SYNC2 > Direct Configuration

33. Select Read from Module
34. Change the Rear Camera to FNA RVC Present

35. Click Write to Module

36. Close the UCDS application down and disconnect the UCDS adapter from the car.
37. Sync 2 should come up with the following screen
Photo of Sync2 reset
38. If it doesn't, you can force it to reset by holding down the right arrow and the power button together
Photo of stereo with two buttons
39. Once the reset is complete, the reverse camera should be active on Sync 2, as well as available in the Settings.
Wiring diagram
Here is a copy of the wiring diagram for the Sync 2
View attachment Rear View camera Sync Gen 2 - Focus mk3.5.pdf
Reverse camera thanks to @Bannko
Testing
Now when you place your car into reverse, it should activate the reverse camera. If it doesn't come on instantly and after 10 seconds you get the message "Camera is unavailable, please contact your dealership", something isn't connected properly. In my case, I was missing the correct Power Converter Module, but as long as you have followed all the steps above, you shouldn't get this problem.
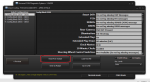
Configurable Camera Settings
There are two settings you can change for the camera directly on Sync2
1. Go to Settings
2. Click Vehicle
3. Click Camera Settings
Parking Pilot - On / Off
This turns the little picture of the car on or off as below
Camera Delay - On / Off
When this is off, as soon as you take the car out of reverse the camera goes off. This can be annoying when you are shuffling back and forward into a space. With it on, the camera will only turn off if you drive over 7mph or apply the handbrake.
One more final thanks to @Tezza
So hopefully that covers everything, if you notice anything that isn't correct let me know. Hopefully this helps someone


