

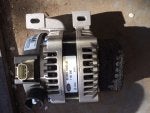
Right after fitting my alternator the other day and finding this how to before http://www.focusstoc.com/forums/topic/81574-alternator/page__hl__alternator I thought I'd copy and paste it but add some photos to it to hopefully help some other members out as I found it not a hard job to do at all and well worth the effort (about 2 hours) to save the £200'ish ford etc charge for fitting
![Image]()
Hi all hope this helps anybody who has suffered the dreaded alternator failure.
I would give this a difficulty rating of about 3 out of 5, this is a guide and I do not want to be held accountable for anything that goes wrong, if you dont feel confident to carry this out then please leave it for someone who is qualified.
Thanks just wanted to cover myself
1. For starters disconnect the battery positive lead.
2. Jack the vehicle up and place on axle stands for safety.
3. Remove the engine under tray, o/s/f wheel and the o/s/f inner plastic arch liner.
4. Now for those who haven't got a DSCI ind kit or K&N ind kit its time to start stripping out your air box or cais.
5. if fitted pull the top plastic pipe off of the synthesiser and then pull the synthesiser from its bracket remove the unit fully.
I APOLOGISE FOR THE LACK OF PHOTO'S UP TO THIS STAGE
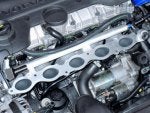
6. You should end up with something like this
![]()
7. Undo the jubilee clip that holds the intercooler pipe to the throttle body
![]()
8. Undo the throttle body multi plug(red) and the vac hoses (1 on left of plenum and 1 underneath the plenum by the throttle body)
Left vac hose
![]()
other one
![]()
The throttle body multi plug is located underneath the plenum and if like mine it was quite hard to unclip and was easier to do after the next stage when the plenum is unconnected
![Image]()
9. Pull out the vac hose on the right off the plenum (you may find it easier to hold the red bit in with pliers and just pull the vac hose out as it can be in there quite tight)
![]()
10. Once this has been done undo the six 8mm bolts going upwards into the plenum chamber(unfortunatly I didnt take any photo's of these but stole a pic from google images to show the location off the bolt holes) the chamber has five green 'O'rings that can be re-used if not damaged.
![]()
11. Lift off the plenum chamber and remove out of the intercooler pipe at the same time.
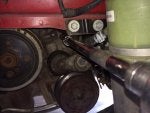
12. Now the fun starts if you look in the arch you will see two belt tensioners an inner and an outer, the inner has a torx 50 hole in it this is where you need someone else put a torx 50 with ratchet in the hole and turn anti clockwise this is a spring tensioner so hold it in positoin whilst the other person removes the belt,release the tension.
![]()
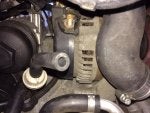
13. Remove the multiplug and the 13mm nut on top of the alternator.
![]()
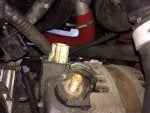
14. Wey hey now remove the three 10mm bolts holding the alternator in place
![Image]()
One at the top
![]()
2 at the bottom
![]()
I found an 8mm bolt holding the dipstick tube in place if you take it out you can pivot the tube slightly which makes it easier to get the alternator out I also found removing the intercooler pipe gave more room to work and get the alternator out
![Image]()
to refit............................. the same but in reverse
![Image]()
the torque setting for the plenum chamber bolts is 10Nm
![Image]()

Hi all hope this helps anybody who has suffered the dreaded alternator failure.
I would give this a difficulty rating of about 3 out of 5, this is a guide and I do not want to be held accountable for anything that goes wrong, if you dont feel confident to carry this out then please leave it for someone who is qualified.
Thanks just wanted to cover myself
1. For starters disconnect the battery positive lead.
2. Jack the vehicle up and place on axle stands for safety.
3. Remove the engine under tray, o/s/f wheel and the o/s/f inner plastic arch liner.
4. Now for those who haven't got a DSCI ind kit or K&N ind kit its time to start stripping out your air box or cais.
5. if fitted pull the top plastic pipe off of the synthesiser and then pull the synthesiser from its bracket remove the unit fully.
I APOLOGISE FOR THE LACK OF PHOTO'S UP TO THIS STAGE
6. You should end up with something like this

7. Undo the jubilee clip that holds the intercooler pipe to the throttle body

8. Undo the throttle body multi plug(red) and the vac hoses (1 on left of plenum and 1 underneath the plenum by the throttle body)
Left vac hose

The throttle body multi plug is located underneath the plenum and if like mine it was quite hard to unclip and was easier to do after the next stage when the plenum is unconnected

9. Pull out the vac hose on the right off the plenum (you may find it easier to hold the red bit in with pliers and just pull the vac hose out as it can be in there quite tight)

10. Once this has been done undo the six 8mm bolts going upwards into the plenum chamber(unfortunatly I didnt take any photo's of these but stole a pic from google images to show the location off the bolt holes) the chamber has five green 'O'rings that can be re-used if not damaged.
11. Lift off the plenum chamber and remove out of the intercooler pipe at the same time.
12. Now the fun starts if you look in the arch you will see two belt tensioners an inner and an outer, the inner has a torx 50 hole in it this is where you need someone else put a torx 50 with ratchet in the hole and turn anti clockwise this is a spring tensioner so hold it in positoin whilst the other person removes the belt,release the tension.
13. Remove the multiplug and the 13mm nut on top of the alternator.
14. Wey hey now remove the three 10mm bolts holding the alternator in place
.gif?auto=webp&fit=bounds&format=pjgp&height=1920&optimize=high&width=1920)
One at the top

2 at the bottom
I found an 8mm bolt holding the dipstick tube in place if you take it out you can pivot the tube slightly which makes it easier to get the alternator out I also found removing the intercooler pipe gave more room to work and get the alternator out
to refit............................. the same but in reverse


